

Today I attended the second Nihonga Japanese watercolour workshop hosted by my weekly art tutor, Sugawara-san. It involved firstly creating momi, a type of Japanese washi paper which has a rough crinkled up but even texture made possible by crumpling the paper and ironing it out. (In fact momi means crumpled in Japanese) By making the momi dual coloured, we get a stunning marble effect. We then paint our desired subject on it in Japanese watercolours.

The process of making momi was very interesting, involving two layers of different shades of Japanese watercolour pigments. First we cover the washi paper with the paint, let it dry and then brush the second layer with another colour. My first layer was a warm yellow ochre type beige, whilst the second was an icy turquoise.

Once completely dry, we just crumple the paper up and wring it. As the washi paper is a special strong and durable type, it does not rip or tear. In fact, it’s almost like cloth! I was aiming for a contrast between warm beige and cool turquoise (right-side sample in the photo below) but somehow the turquoise got merged in with the beige, resulting in a rather greeny shade (left-side sample) Not a big deal as the tutor told us we could always add another layer of turquoise at the later stage. But as we later discovered, that was not necessary!

The great thing about art is that there’s always the unexpected. Things are not always going to go as planned. But we accept it and think of it as an opportunity. A time to think positively and recreate. And tell ourselves it worked out for the better. Here the intended turquoise in fact turned more a Matcha green tea colour which gives an even more Japanese flavour!

Next step is to literally steam iron the paper to flatten and smoothen it. Place the paper facedown on a tea towel with a kitchen roll paper in between and fold the tea towel over the paper and lightly iron on it. After that, we mount the paper on a wooden panel. Here it was 21cm by 17cm. Apply rice-base glue on the sides of the panel, wet the back of the paper with a layer of water using a big brush, leave for a minute then spread the paper on, ironing out any wrinkles using both hands.

Now time to paint! You can use either the powdered pigments or the gansai watercolour pans. I chose the latter, as it made a change from using the powdered pigments used in the previous workshop. Before that, we traced the subject onto the paper using red carbon paper. Reason why, by the way, the colours keep changing in these photos is the position of the painting against the light.

The subject I opted for was momiji leaves in line with the coming of Autumn. It is customary in Japan to go by seasons for artwork, and these leaves are a typical symbol for the season. It was quite handy having had traced the leaves in red as opposed to black since it helped blend into the colours I chose. Vermillion for the outer two leaves of the three and orangey-yellow for the middle. For the vermillion leaves, I painted the veins in gold as suggested by the tutor. What a clever idea!
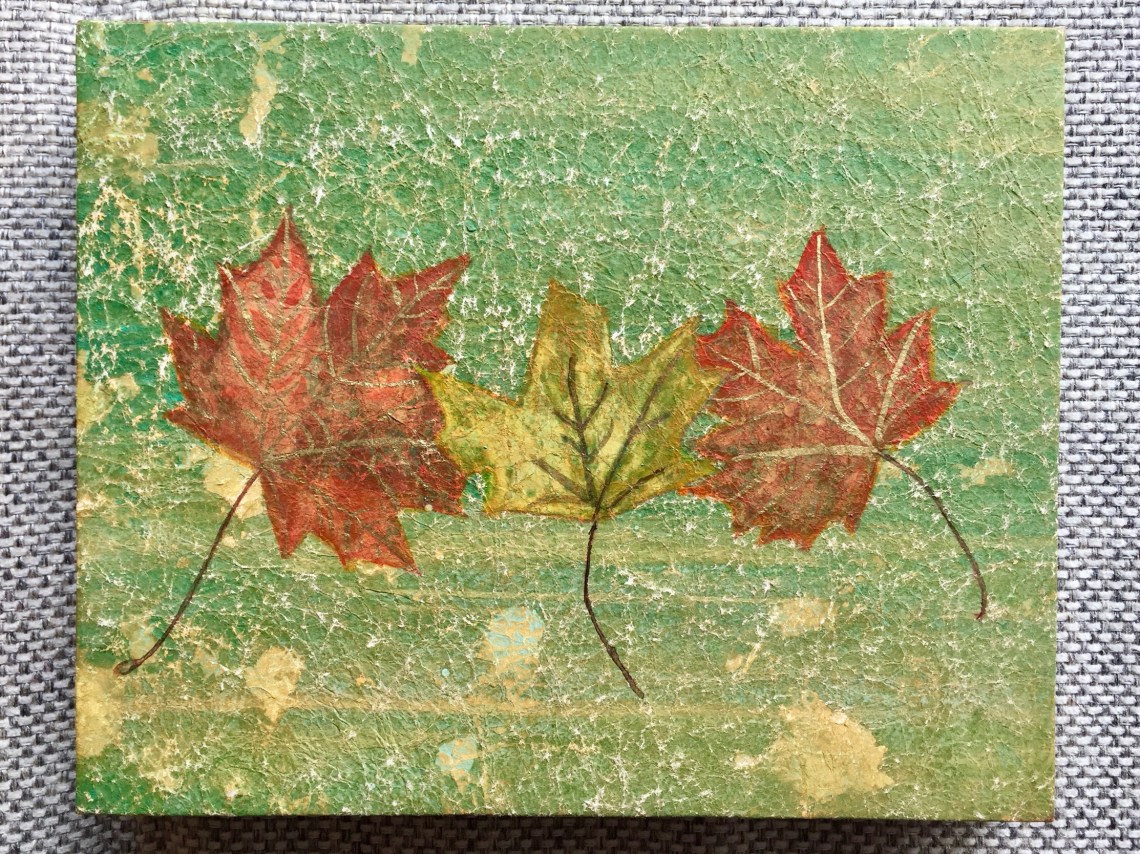
We had five hours to complete the artwork, from creating the momi paper to concluding the painting. As such, I deliberately chose a simple subject. Even with a simple subject, it all turned out beautifully since the focus is on the marbly background. It was also cool how the matcha green turned out unintentionally. The yellow spots were also an accident caused by allowing the water to drip whilst mounting the paper on the panel. It certainly gives a distressed look, doesn’t it? Today was a good day.

2 Comments